

Image to video is one of the easiest ways to make a still image feel alive. Instead of starting from a text prompt only, you begin with a photo, illustration, or design and let AI add motion, camera movement, and transitions. Videoinu’s official Image to Video pages present it exactly this way: a tool that turns static images into animated video clips with natural motion and visual depth.
What makes this workflow useful is that it stays simple. You upload an image, describe how it should move, generate the clip, and download it.
Videoinu also says its Image to Video feature is powered by multiple AI video models, so users can explore different animation styles from one image instead of being locked into one result.
What Is Image to Video?
Image to video uses AI to animate a still image into a short video. According to Videoinu, this can work with photos, illustrations, artwork, product images, and more. The platform says AI automatically adds movement that feels smooth and intentional, which helps static visuals become more engaging video content.
That makes image to video useful for more than simple effects. A creator can animate a character illustration. A brand can turn a product photo into a short ad clip. A designer can bring concept art to life. Videoinu’s public pages frame this as a practical workflow for ads, social posts, promotional content, and other short-form video needs.
Why Use Videoinu for Image to Video?
One reason is ease of use. Videoinu’s official how-to section for Image to Video is very direct: upload your image, describe the motion, then generate and download. The FAQ also says you do not need animation or editing skills because Videoinu handles the animation process automatically.
Another reason is flexibility. Videoinu says its Image to Video feature is powered by multiple AI video models, each optimized for different animation styles. Some are better for cinematic camera motion, while others focus on expressive or stylized movement. The site also says users can generate multiple versions from the same image and choose the one that best fits the project.
Videoinu’s public model directory also shows that the broader platform includes model families such as Luma, Pika, Runway, Seedance, Sora, VEO, Vidu, Wan, Kling, and others. That matters because creators often want options when they test different visual directions.
How to Use Image to Video on Videoinu
Step 1: Upload Your Image
Start by choosing the image you want to animate. Videoinu says you can upload a photo, illustration, or design, and its generator page accepts JPG, PNG, and WEBP files up to 5MB, with a minimum width or height of 300 pixels.
A strong source image usually has:
- one clear subject
- readable lighting
- enough space for motion to feel natural
If the original image is busy or unclear, the animation can feel less focused. A cleaner image usually leads to a better result.
Step 2: Describe the Motion
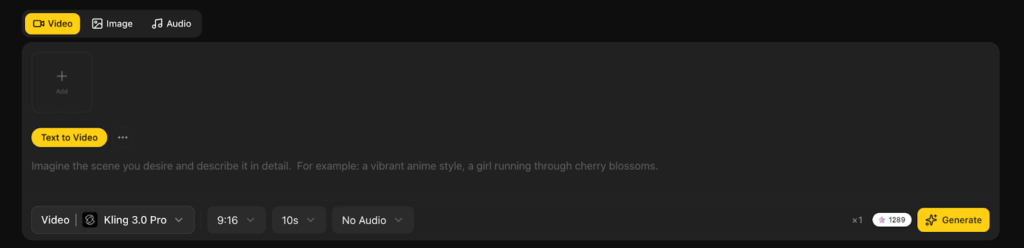
After uploading the image, describe how you want it to move. Videoinu’s official page says you can guide camera movement, subject motion, or visual transitions, and that the platform selects the best AI model automatically. The generator interface also shows the prompt as optional, which means you can keep this step simple if you only want light animation.
A good motion prompt focuses on movement, not on rewriting the whole image. For example:
A slow camera push-in while the woman’s hair moves gently in the wind.
That works because the image already gives the system most of the visual information. The prompt only needs to guide what changes over time.
Step 3: Choose the Format
Videoinu’s image-to-video generator page shows aspect ratio options such as Landscape 16:9 and Portrait 9:16, plus a default expectation of a 10-second video. It also shows that sound will be generated.
This step matters because the format should match the final use case. A portrait clip often makes more sense for Shorts, Reels, or TikTok. A landscape clip usually works better for YouTube, websites, or wider cinematic scenes.
Step 4: Generate the Video
Once the image and settings are ready, generate the clip. Videoinu says this step lets you preview the animation and download the video instantly. The platform also describes the motion as natural and intentional rather than slideshow-like, which is a helpful goal to keep in mind when judging the result.
The first version should usually be treated as a draft. Watch it and check:
- whether the motion feels natural
- whether the subject stays clear
- whether the clip still matches the original image
- whether the pacing feels right for the platform you want to use
Step 5: Try More Than One Version
Videoinu says users can generate multiple versions from the same image and compare different animation styles. This is one of the most useful parts of the workflow. If the first version is close but not right, change one thing at a time. Try a different motion prompt, a different aspect ratio, or a different visual direction.
This is also where Videoinu’s broader model ecosystem matters. Since the platform supports many AI video model families, including Luma, Pika, Runway, Seedance, Sora, VEO, Vidu, Wan, and Kling, users have room to explore different looks in one place.
Tips for Better Image to Video Results
Start with a clean image. Since image to video builds motion from the uploaded visual, the source matters more than people expect. Videoinu’s workflow begins with the image itself for a reason.
Use the prompt to guide movement, not to describe the image again. The image already carries the look. The prompt should mainly shape motion, transitions, or camera feel.
Think in short clips. Videoinu’s generator interface currently expects a 10-second result, and its FAQ says image to video works best with short clips, though multiple clips can be combined into longer videos later.
Test more than one version. Videoinu explicitly says users can generate multiple versions from the same image, which is often the best way to find the strongest result.
What You Can Create with Image to Video
Videoinu says image to video can be used to animate photos, illustrations, artwork, product images, and designs. Its page and user reviews also point to use cases like ads, promotional content, social media clips, and product animation.
That makes the tool useful for several types of creators. A marketer can animate a product image for an ad. An artist can turn still artwork into a moving clip. A creator can bring a single character image to life for social content. Because the workflow is quick, it is also a good way to test ideas before committing to a bigger project.
Final Thoughts
Image to video on Videoinu is a simple workflow with a useful result: upload an image, describe the motion, generate the clip, and refine if needed. What makes the platform stronger is that it combines this easy process with multiple AI video models and different animation styles, which gives creators more room to experiment without leaving one platform.
FAQs
What is image to video?
Image to video uses AI to animate static images into video clips with motion and transitions. That is how Videoinu defines it on its official page.
Do I need editing or animation skills?
No. Videoinu says it handles the animation process automatically.
What types of images can I use?
Videoinu says you can use photos, illustrations, artwork, product images, and more. Its generator page supports JPG, PNG, and WEBP files up to 5MB.
Can I control how the image moves?
Yes. Videoinu says you can describe camera movement, subject motion, or visual transitions.
Is image to video good for ads and social media?
Yes. Videoinu says it is widely used for ads, social posts, and promotional content.